Wednesday, May 28, 2014

Posh Purpose Review: Sephora Purifying Brush Shampoo

I think every woman should have a nice set of makeup brushes.  You don't have to wander around with a bazillion brushes like the makeup artist from X-Men or your local makeup counter salesperson, but a handful of really decent brushes makes applying cosmetics much easier.  My go to set of basic brushes includes one for concealer, foundation, powder, eye shadow, bronzer, and blush.  If you have those and an eyelash curler and tweezers, you should be set!  My brushes tend to get pretty gunked up after regular use and I've tried a few different methods for cleaning the brushes - soap and water, makeup remover towelettes, and Bare Minerals brush cleaner - but none of them worked that well.  I read a tutorial a few months ago on Fashionable Hostess on cleaning your brushes and it recommended the Sephora brand Purifying Brush Shampoo.  I decided to give it a go and ordered the small bottle for $7.
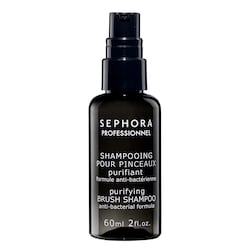
Sephora Purifying Brush Shampoo
$7-$15
Image Source: Sephora

Here's the before of my gross brushes in desperate need of cleaning.  My brushes are a mixture of Nordstrom and Bare Escentuals brand (the eye shadow brush came with the Urban Decay Naked Palette, but I kept using it after I had used up the palette).  I followed the instructions which basically consist of squirting some product in the palm of your hand, repeatedly wetting the brush and swirling it around the soap, rinsing until clean, patting dry and reshaping the brush, and then letting air dry.  I used two car shammies to blot the brushes and to lay the brushes on to dry.


Here is the after!  The biggest difference is in the bronzer and blush brushes which are now back to their normal white....but also check out the concealer brush (far left) and the eye shadow brush (middle).  Notice that the tips of the brushes are a different color now?


I've now used the Sephora Purifying Brush Shampoo twice on my brushes and it has worked out great!  The first time, my brushes were seriously nasty and it took me about 30 minutes to get them clean.  This time it was much easier since I had only let about 6 weeks pass before cleaning them again.  It took me about 15 minutes to clean them up.  My brushes feel much softer and cleaner now and I feel better about using them (no more icky bacteria on my face!).  I've only used a small bit of product, so I would feel comfortable recommending the smaller size at $7 since it should last you through several cleanings, which keeps you from shelling out $15 for brush cleaner and from having to store a bigger bottle (mine fits perfectly in the medicine cabinet).  Anyone else tried out this product?  Let us know in the comment section below!

Tuesday, May 27, 2014

Posh Purpose: Styling Your Patio Garden

I hope everyone had a great Memorial Day with friends and family!  Mr. 3 and I had the most relaxing and productive weekend that we have had in quite some time.  We mixed in a little bit of housework (cleaning off our patio, hanging artwork in the living room and guest bedroom, and lots of laundry) with a bunch of fun (going to the movies, taking a bicycle ride (which is more terrifying than fun for me), grabbing ice cream in Old Town Alexandria, and antiquing for me).  One of our weekend treats was going to Home Depot to pick out plants for our patio garden.  I had originally thought that I would pick up a few terracotta pots and paint them to match my green, pink, gold, and black color scheme going on out on the patio...buuuuuut then I found these cute ceramic pots at Michael's which saved me the trouble of getting them painted:


The pink pots were originally $4.99 and the white pot was $9.99, but Michael's was running a 50% off sale and I had a 10% off total purchase coupon.  Which brought the pink pots to $2.25 and the white pot to $4.50.  The pink pots had a hole for drainage and the saucers were attached to the pots.  The white pot also had a hole for drainage, but didn't come with a saucer (I had an extra one already).  Overall, I thought these were a great deal!

I decided to plant banana peppers, jalapenos, basil, and mint with the hopes of spicy salsa, caprese salad, and mojitos for the summer!  Planting the peppers and herbs was super easy.  I chose to buy the seedlings rather than the seed packets since I figured there was less chance for planting error, overwatering, and neglect if I picked out something that had already gotten a good start.  I also didn't feel like waiting 4-6 weeks for my crops to come in.  The plants cost between $3.33-$3.68 each and I picked up a really small bag of organic potting for about $5. Since my garden is very, very small, I just used a solo cup to scoop out the dirt rather than buying trowels or gloves.


Aren't they cheerful?  I love the bright pop of color that they bring to the patio and I'm going to save a good bit of money on pricey basil and mint even if I only get a few "harvests" out of them.  Pre-packaged basil and mint usually cost between $3-4 at the grocery store.  Even if I only get to use them twice this summer I will pretty much break even on the cost of the plant and pot.


Here's a few tips for styling your patio garden:

1. Check out craft stores for prettier and cheaper pots than you can find at Home Depot.  There were no pink pots to be had at Home Depot and the cheapest fancy ceramic pot I saw was $7.

2. Take your color scheme into consideration.  I love that the bits of green plants play off the pink and white outdoor rug and my outdoor entertaining servingware.  Try to find pots that bring a pop of color to your patio...it may help remind you to water them and also use the plants you've so carefully planted.

3. Buy plants that you think will last on your patio.  I have indirect sunlight pretty much all day long with a few hours of direct sun as well, which will be great for all my plants.  I decided not to buy bell pepper or squash because we have a big tree that a squirrel could very easily crawl up and jump onto our patio to grab a tasty snack.  I think it will stay away from my hot peppers...at least after the first time.

4. Go with multiple small sized pots if you don't have much space or if your available space is awkward.  If you have enough space and don't want so many containers, buy one or two large sized pots and plant multiple items in them like herbs in one and peppers in another.

Anyone else tried to make an apartment garden?  Send us pictures!

Friday, May 23, 2014

What to Wear: Poolside Fashion

I'm so happy to have a four day weekend aaaand not have to be trapped in a car headed away for the weekend.  D.C. has nightmare traffic and although I would dearly love to be at the beach, I'm super happy to be spending time at home, planting some herbs and hanging out by the pool.  One of the best upgrades in moving into this apartment is that there is a community pool.  While I'm not one to sit and bake all day (what with being melanin challenged), I do like swimming around and reading magazines while I dry off.  Mr. 3 (who is not melanin challenged) may work on his tan (men are so lucky...they have far less concern about wrinkles) and will also come swim with me in the pool.  The pool is located in a different part of our complex, so we will have a short walk around the hood to get to our destination.  Some of our route to the pool is actually on public streets, so a cover up is  definitely necessary.  Here's my list of poolside fashion necessities:

Cover Up: I like to be cute, but tasteful....so no see through cover ups and my tush/lady bits should be covered.

Shoes: I also don't understand women who wear super high heels to the pool...seems dangerous, uncomfortable, and impractical.  If you are trying to grab the attention of a certain man, trust me a swim suit is enough...its basically socially acceptable underwear.  Opt for slide on shoe - a cute flat, flip flop, or shoe with a very, very, very small wedge (like an inch or less).  If you don't feel like your shoes will get destroyed and you want something that can take you from the pool to a nice dinner, invest in a nicer quality pair so it will be less to pack for vacation.  If you are headed to the beach, go for a cheap pair because inevitably sand + leather + salt water + $$$$ = sad beach bunny.

Accessories: Of course, no matter if you are melanin challenged or not, make sure to bring your hat and sunglasses...you'll need them for the hottest parts of the day and to shade your eyes while you try to catch up on your reading.  Definitely keep the hat cheap, it will probably get smushed at some point and it's going to cover your chlorine saturated head anyways.  World Market has some great options.  For sunglasses, it depends on your personality.  I have friends who refuse to buy expensive sunglasses because they lose them or squash them and they buy tons of pairs from Target, Marshalls, and TJ Maxx and keep them stashed all over the place.  I have purchased three pairs of expensive sunglasses, purchased at Nordstrom Rack, and I paid $50-$80 for each of them.  HOWEVER, (knock on wood), I have only lost one pair which I had for about three years before losing them.  I do keep one really cheap pair for playing in the ocean so if a wave knocks them off, no worries.  No matter which way you go, pick ones that cover a ton of your eyes to avoid sun damage.

Beach Bag: Finally, pick out a cute beach bag to tote all of your sunscreen, reading materials, ipod, etc.  Go cheap on these because you'll probably wind up spilling sunscreen or a drink and be really really really sad to see a stain on your $400 tote bag.  I suggest a contrasting but complimentary color to your cover up.

Overall Style:  Pick a style that goes with all your swimsuits: sexy (but not trashy), sporty, and preppy glam are all great choices!


Posh Purpose Cover Up Style for the Pool


Tory Burch bohemian tunic / Victoria s Secret swim cover up / Blue pants / Flip flop sandals / Kate Spade white sandals / Forever 21 flip flops / Jute tote / Monsoon decorating bag / Forever 21 tote bag / J Crew palm hat / J Crew hat / J.Crew mirrored glasses / Twill Cotton Cap Mint / Retro glasses / Topshop plastic glasses

I really love those beach pants from Lilly Pulitzer.  I've tried them on in store and they are sooooo comfortable and lightweight, despite being long.  I suggest topping them off with a cheapy colored tank top from Walmart or Target.  The tassel on the aqua tote bag is also adorable and helps tie it back to the Tory Burch tunic preppy glam look.

There is no need to go out and buy a totally new outfit.  I haven't found a cute tote bag yet, but I bought a new cover up from World Market (which is my first since college! on sale for $25!) to match my red bathing suit I got from Nordstrom last year.  Even though it's cream colored, it's also lined so I don't have to worry about it being see through.  My hat is from American Eagle from two years ago and my silver flip flops are Lilly Pulitzer (which I got for free during one of their Endless Summer sales as part of a promotion).


Watching your pennies? Check out raise.com for discounted gift cards to get your poolside fashion on! You can also sell any unwanted gift cards you have lying about. Right now you can snag a Nordstrom gift card for up to more than 2% off the face value, or perhaps sell yours for over 97% face value depending on which way you are working the website. Combine that with Ebates 6% off Nordstrom purchases for a new bathing suit and you save enough money for good quality sunscreen, SPF 80! Our philosophy: more money saved = more fun sun hats. And wear sunscreen!


Check out our Posh Purpose Spray Tan Tips and World Market hat selection for completing your look!  I hope everyone has a wonderful weekend relaxing!


We are not being compensated by any of the stores or websites mentioned. We just love sharing (and hearing about!) favorite shopping habits.

Thursday, May 22, 2014

Thrift Store Purchases

I've slowly realized that while I share all kinds of thrift store finds with y'all, I rarely show things that I actually purchase. I don't do this on purpose, it just seems to happen. Usually it is because I don't have pictures of the things I purchase because I toss them into my cart too quickly so no one else can snatch my things. I don't want y'all to think that I have a warehouse full of furniture! In reality, it is just a few pieces. So today I will share all the items I purchased during my Habitat visit yesterday.


I picked up this ice bucket for $3. It is a bit dirty but once it is clean (and I have space for a bar cart), there are big plans in store for this thing. I don't know if it will go with my future decorating scheme but for $3, I'm willing to risk it.


While we are not sure, J and I suspect this serving stand is silver plated. Also it cost me 50 cents. Even if it made of a less fabulous metal, I plan on using it to hold 9x9 pyrexes with whatever food one cooks and serves in a pyrex.


You may have caught a glimpse of these skulls in the picture above. I bought two for 50 cents each. I know Halloween is far away but you can't pass up such a good deal when you have always wanted to glitter a skull.


This is a serving bowl. At $8, it was by far the most expensive thing I bought yesterday and I have no clue what I will do with it. But it looks really cool and coordinates with a set of tea cups I bought with Melinda at the Boys and Girls Club. Speaking of that store, I should go back this Saturday during my thrifting excursion with my brother-in-law.

My thrifting trips always end differently. Sometimes I buy a coffee table and matching end table (when I have no space for either in my teeny tiny apartment). Sometimes I leave with nothing. Usually I try to limit myself to things I will legitimately use in my future home - I didn't own a coffee table prior to the purchase mentioned earlier. But sometimes I can't help myself when I spot something weird/cool like the bowl above. We would love to hear what y'all usually find in your thrift stores! Please share!

Wednesday, May 21, 2014

Posh Purpose Tips for a Perfect Spray Tan

Being melanin challenged, I've been spray tanning pretty much every summer since grad school.  I like a good golden glow, but achieving this without looking like an oompa loompa can be challenging if you aren't careful.  I've had many an orange palm or funky looking foot.  BUUUUUT, I think I've finally figured out a few tips that will help anyone looking for a sunless tan.  I usually use the Versa Spa tanning booths, I find they give the best color and the most even coverage.  Regardless, these tips should help you get a even glow no matter where you go!

Posh Purpose Spray Tan Tips

1. Shower, shave, and exfoliate before you go (this is pretty much standard advice you can find in any beauty magazine).

2. Moisturize your face.  For some reason, faces, hands, and feet suck up the tanning solution and wind up looking really off.  If you moisturize your face before you go your face won't absorb quite as much of the solution.

3. Make and take a post-tanning kit.  My salon keeps these supplies available for clients, but if yours doesn't take the following (1) pack of baby wipes, (2) cotton balls, and (3) Q-tips.

4. Ask for an extra towel before heading into the booth.  Lay it down on the floor, this will keep the bottoms of your feet from getting too tan.

5. After you put on the hair cap, put lotion on any dry spots you have on your elbows and knees (the tanning salon has barrier cream that is really thick).  Also put a good coat on your hands, palms, and feet.  Do an extra heavy layer over each nail.

6. Once you've gotten sprayed, hop out and take the towel on the floor with you (most systems have an autowash, so don't leave it behind to get wet).

7. Immediately pat down your face with a towel.  Grab a baby wipe and wipe off your palms as quickly as possible.  Grab your towel and wipe the lotion off the back of your hands and feet.

8.  Grab another baby wipe and wipe it over each nail.

9. Take your shower cap off and grab a cotton ball.  Run it around your hairline to blend in. 

10. Take care of your hands by taking another cotton ball and running it over each knuckle and down by your wrist.  Do the same with the tops of your toes, your ankles, and the sides of your feet.

11. Take a Q-tip and run it around the outside of your ears.  The solution tends to collect in your ears which gets icky.

12.  Run one last baby wipe across your palms and then finish with a bit more lotion applied just to the back of your hands.

13. To preserve your tan skip the lotion and expensive tan preservers that the salon will try to sell you.  Instead, pick up a jar of organic cold pressed coconut oil.  Briana and I have been trying it out and will report more soon, but since I started using coconut oil as a moisturizer my tan has lasted a lot longer AND I'm not getting that weird crackle in the tan color that appears after a couple weeks of tanning.

This sounds like a lengthy process, but I'm usually in and out of the salon in 15-20 mins from start to finish for steps 4-12.  I find that blending really helps and the baby wipes are essential!  Hopefully, these tips will help you get golden glow for the summer!