Monday, October 31, 2011

Munchie Monday: Roasted Tomato Soup

I hope you enjoyed the previous post! If you are not a fan of fried things (gasp! do those people even exist?!), you will probably enjoy this recipe a lot more.

I am not a soup person. I refuse to acknowledge whatever health benefits it may have for sick people and I do not enjoy eating it. Well, other than hot and sour soup and tomato soup.* A few weeks ago, I decided I was in the mood for some tomato soup. However, since I am a future housewife I thought I should put a bit more effort into the meal than opening some Campbells. My sister Natalia sent this Roasted Tomato Soup recipe to me and I knew I had to try it out (btw I highly suggest you check out that blog, it has some delicious recipes!). I did not do the cheese crust on top and opted for regular oven baked grilled cheese sandwiches instead.

J believes that it is a snack if there is no meat, but he did not even notice that I went vegetarian on him for the night! He also said that this was the best meal I had made for him, second only to my cast iron fried chicken. And now here is my altered version of the delicious recipe.

Ingredients

  • 3 lb plum tomatoes, halved lengthwise
  • 2 tbsp olive oil
  • 2 large garlic cloves (mine were peeled)
  • 1/4 tsp dried thyme, basil and a pinch of oregano
  • 3/4 tsp crushed red pepper (yum! spicy)
  • 4 cups chicken broth
Directions

  1. Preheat oven to 400 and wrap garlic in tin foil
  2. Put tomatoes in a large mixing bowl and add oil, salt and pepper then mix
  3. Spread tomatoes out on a cookie sheet and add the tin foil garlic packet
  4. Switch oven to broil and put cookie sheet on the top rack for about 5 minutes
  5. Switch oven back to bake at 400. The tomatoes should take about 45 minutes at this point, but check every so often to make sure they are not burning.
  6. Unwrap garlic packet and put garlic and tomatoes in a food processer. Blend until it is a consistency to your liking (mine was entirely smooth). 
  7. Pour tomato mixture into a pot and add chicken broth, herbs and red pepper. Bring to boil and then simmer uncovered for about 30 minutes. You can alter cook time so that it is the consistency that you want.
  8. Eat and enjoy!


*It amuses J to no end that I hate soup and I hate tomatoes, but I love tomato soup


Halloween Treats!

Happy Halloween, y'all! In honor of this amazing day, I wanted to share with you something amazing that I cannot believe I haven't heard of before.


I love love LOVE candy corn and will definitely be frying some up. Or maybe have J do the frying, I always burn myself. I hope y'all all have a great holiday! To our Florida readers, don't sweat too much! To everyone else, enjoy the fall weather! 

Friday, October 28, 2011

Fresh Idea Friday: Crayons, All Grown Up

My super sparkly friend Ashley recently took it upon herself to do a craft project. She is so creative and crafty!


This project is a great idea for a kid's room or for throwing some fun color into a room! You need a big box of crayons, hot glue, a canvas and a hair dryer. Glue the crayons in whatever order you like along the top of the canvas. Ashley did hers by color, which is a lot of fun and probably makes the color drips combine better. Once the glue has dried, just run the blow dryer over the crayons so that they melt and start dripping. Let it dry and admire your handiwork!


Wednesday, October 26, 2011

Wedding Tip Wednesday: Gum?!

Let this be a reminder to all brides: don't chew gum on your wedding day!


Kemper Mills Fant Photography

This picture has such potential! But it is ruined by the gum hanging out of the bride's mouth. Rather than remembering a tender moment between you and your loved one, you shall stare at photographic evidence of your poor choice for the rest of your life. Consider banning gum for all wedding party and family members when the photographer is being paid. You will thank me later.

BTW, if you are searching for a photographer in the Virginia area, you should check out the above link. There are some great gum free images! The wedding packages start at $4000.

Tuesday, October 25, 2011

Trousseau Tuesday: Wedding Shoes!

Recently, a family friend said she wanted to buy my wedding shoes since she knows how important they are (pretty much on the level of the dress). I have been perusing the shoe departments ever since and have not found anything, though! I want something delicate and fun! But it seems the designers are showing no love to skinny legs - everything is clunky! Hopefully I will find something that I love. Suggestions are welcome!


These Christian Louboutins just aren't working for me. They are super sparkly, but.. meh. I feel like I can do better for that amount of money.


These shoes are a lot of and black would fit in my December 1 wedding, but I still don't love it. They kind of remind me of witch shoes, and while I generally embrace my witch like qualities I need a different look for my wedding day.


Now these shoes are fun! I could definitely do my something blue with one of these pairs. However, Mother does not love the idea so I shall keep searching!

Monday, October 24, 2011

Munchie Monday: The McRib Returns

For those of you haven't met me in person, you should know that fall is my absolute favorite time of year.  I could wax poetic for days about the leaves, cooler temperatures, and fall fashion; however, just as important is the fall food! 

Pumpkin spice lattes, hot cider, and McRibs are three of my favorite fall treats.  Last week, I discovered that the McRib is back and as delightful as ever!  For those of you who aren't in the know, the McRib is only available now through Christmas.  Sadly, you may need a McRib locator to find a McDonald's that is serving the sandwich (not all locations have recognized the awesomeness of the McRib....and we wonder why there is a recession going on...)

I hope all of you are as excited as I am for the yummy BBQ goodness!

Thursday, October 20, 2011

Thrifty Thursday: Consolidating Furniture

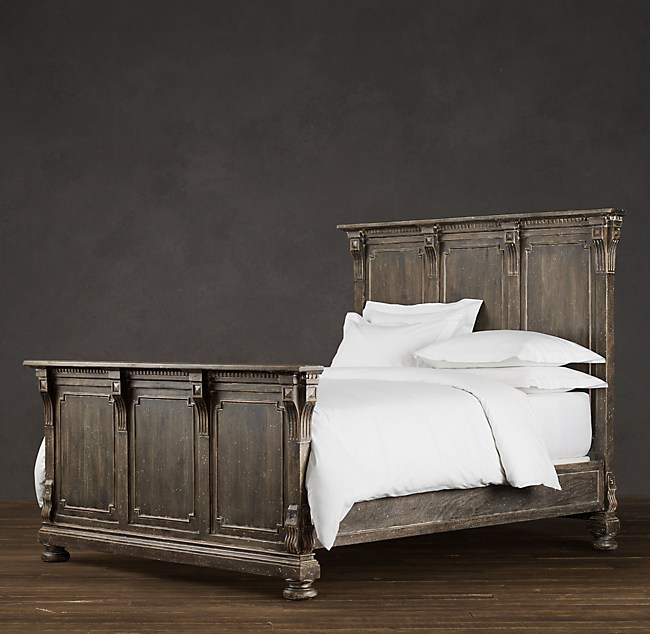
I always think about things way before I need to. For example, I am already concerned about furniture for my future married apartment. More specifically, I am concerned about J's bedroom furniture.

His bed..
and the rest

I am in love with this bed

As you can see, his bedroom set is extremely masculine and modern and totally not my style at all. While I have no issue with keeping most of his furniture during our time in Boston (assuming it is brief), I don't see much point in paying to move furniture to another corner of the country (Atlanta, here I come!) if we are just going to get rid of it quickly. And don't tell me the guest room solution! Mother will be giving me my bedroom furniture (bed, two desks, armoir, bedside table) as soon as we relocate closer to Florida. My princess bed and matching pieces will make a lovely guest room and I doubt we will have more than one spare room.

Fortunately, J is slowly coming to terms with replacing his furniture with a bit of help from his mom (can you believe he was adamantly against it at one point?!). She actually warned him not to invest too much in furniture because his future wife would not be interested in keeping it. He ignored her wise advice because he thought he would not be getting married for another 10 years or so (this was pre Briana). Silly J. 

I have been trying to think of ways to salvage his drawer pieces but I am at a loss. I thought about antiquing the wood and then installing fun knobs a la Anthropologie. However, the lines of the furniture are so severe that I am not sure that it will look good once I am done. Tips would be greatly appreciated! 

Advice to single men: don't waste your money on good furniture - your future wife will want to get rid of pretty much all of it.

Wednesday, October 19, 2011

Wedding Tip Wednesday: Stock Up Now!

If you are getting married sometime next year, now is the time to start your stockpile of wedding decor.  Discount stores such as TJ Maxx, Marshalls, Home Goods, and Target have already started putting out their Christmas merchandise and it's a great time to stock up for your wedding! 

Although you may not be having a Christmas wedding, this is the time of the year when stores will have the biggest selection of white, metallics (of all kinds), reds, and greens.  Christmas decorations come in all sorts of themes (elegant, homey, cheesy, etc), so there should be something out there for everyone.  If you are planning on having any sort of bling at your wedding (mirrors, candle holders, decorative dishes, etc.), there is a much greater selection of these items at Christmas.  If bling is not your thing, also check out these stores for more rustic items but in rich colors like forest green or cranberry (both of which are perfect for fall weddings).

Christmas decor is also much more affordable than if you purchased a similar item at a different time of the year.  Stores are trying to attract consumers and encourage them to buy more by offering inexpensive items to decorate the home.  So a silver votive holder that may cost $4 in the summer is only $2 now.  Don't forget about table linens, these can often be some of the best prices you'll see all year!

I would start looking now to decide if there is anything that might fit in with your wedding decor.  If it seems like a good deal or is within your price point you may want to consider buying early for the best selection.  Stores like TJ Maxx, Marshalls, and Home Goods have continous stock turnover, so if you like an item and its affordable, snatch it up!  However, department stores and places like Target have their stock set pretty much for the entire season  So, if you are looking for a bigger discount on the items you love, or simply can't afford the price tag, you can wait until the day after Christmas for the big sales.*

If you are going to try to get the bigger deals after Christmas and you are hyper organized (like I sometimes am), take pictures (including the price sticker!) as you shop throughout the season, creating a wish list/inventory of all the items you would like to purchase.  You can then organize your day of shopping around which stores you should visit to pick up the items you MUST have and which items you would LIKE to have.  Enlist help from your neighbors, friends, and family if they are going out the day after to shop, ask them where they are headed, ask them to pick up the items you want, and send them pictures and the price you are willing to pay for each item.  Using this method, you should be able to (1) make a budget and estimate the costs of your purchases and (2) snag some significant savings!


*Bonus tip: I have been in Target before on Christmas Eve at about 4 PM looking for a Snuggie (don't judge, I want to keep my mama warm and still allow her to sew while she watches TV) and  Target had already started marking down its' Christmas stock.  Might be worth looking into if you have the time!      

Tuesday, October 18, 2011

Trousseau Tuesday: The Importance of Pants

BALANCING ACT photo | Christina Aguilera
Christina Aguilera
Photo From: People Online

A picture is worth a thousand words...

Munchie Monday (1 day later): Bliss Bites

Sorry for the delay on our munchie Monday!  Briana and I have been crazy busy.  I don't want our readers to think we are neglecting them, so I'm sharing the EASIEST, no bake dessert recipe that you can take to any event (or eat snuggled up on your couch...I won't tell).  Ladies (and gentleman), I bring you Bliss Bites (you may thank me later!):

Bliss Bites
(aka sweet little tastes of heaven)

Ingredients:
1 bag of Oreos (I love Double Stuf!  Oh, and please don't bore me with the reduced fat kind.  Oreos are bad for you regardless...you might as well own it!)
1 block of cream cheese (softened to room temperature)
1 bag of either chocolate chips or that melting chocolate (for variation try Mint flavored chocolate)

That's it!  Three ingredients! WAHOO!  You can probably find at least one of these items on sale at the grocery store too.

Directions:

Take Oreos and smash them up in a big bowl with (CLEAN) hands.  Dump block of goodness, er, I mean, cream cheese into bowl and mix with Oreos. Line a cookie sheet with wax paper and form small balls of Oreo/cream cheese and place on cookie sheet.  Now, you can go two routes depending on (1) how much time you have and (2) how egregious you want this dessert to be. 

Prepare a double boiler, heat in microwave, or stir chocolate in pot - however, you like to melt your chocolate without burning it.  If you are watching your calories (stop making this recipe, in fact, don't even bother buying the ingredients) or you don't have very much time, drizzle the melted chocolate over the bliss bites and stick in the refrigerator. 

If you have the time, refrigerate the bliss bites before preparing the melted chocolate for about 30 minutes.  Then dunk, dump, or drop the melted chocolate over the bliss bites and refrigerate.

This recipe makes...a bunch...depending on the size of your bliss bites. If you keep them to about meatball size,  then you should be able to make at least 48 bliss bites!

Totally easy (and inexpensive), right?  If my office is any indicator, these will be gone in minutes.  I recommend eating two at a time and with milk!


Friday, October 14, 2011

DIY Holiday Wreath

My sister Rebekah is so crafty! She made this wreath and wrote up how she did it. 


Wreaths seem to be quite popular for home decor.  While you could go out and spend a fortune on a pre-made wreath, I have been using Pinterest to find some cute, unique, and made-by-me wreaths.  This Halloween wreath would be adaptable to any season or decor.  I wrapped a Styrofoam wreath in 2 inch wide ribbon and glued it with tacky glue.  (Do not use hot glue on Styrofoam.)  It took two rolls of the ribbon to wrap my wreath.  Always buy more than you need and return it.That way you can finish the project while you are on a roll (no pun intended). I used some straight pins to keep the ribbon in place while the glue dried.  It does take a few hours to get a good stick, so do this step first and let it dry while you are cutting the ribbon for the next step.
    
You will need to selected 10-12 rolls on narrower ribbon. The more variety, the cuter the wreath. I used 7 different patterns and textures.  Make sure it has some with a good contrast like light and dark or cute patterns like plaid and dots.  Halloween ribbon was on sale the week I purchased all of this so it made the entire wreath very affordable!   I did use sheer but be careful with hot glue and sheer ribbon- it does seep through to your fingers!   Cut them into 4 inch strips, make a loop, and use a little hot glue to keep it together.  I also saw someone that did all of this with straight pins, but that does not sound so sturdy to me.  You can also create a twist in your loop to give it a different look.  

The final gluing was to adhere it to the ribbon on the wreath form.  I glued about 1/2 inch  of each loop to the wreath.  Then I bent the top side of the ribbon about 1/4 of an inch and glued it down to make the ribbon so it stood up and did not droop.  You may have to play with this idea to get the look you want.  I started on the inside circle of the wreath and then layered it out.  I used three rounds of ribbon.  I also used straight lines around the wreath.  You could make it a random pattern too.  Also, do not be concerned about the placement of the colors.  I started thinking about what color went where, but it the end, it all blends nicely.  It is okay to have the same color close to the other.  Do not think too hard about this step!  Just glue the ribbon on the wreath and it will turn out beautiful.

{On a side note, I almost stopped half way through thinking it did not look good- but I kept on gluing and it turned out great! Always wait until the project is finished before you critique it!}  

As a final touch, I made a little bow for the top.  I used some of the leftover ribbon from wrapping the wreath and a piece of one of the coordinating ribbons.  You may want to position this and however you are going to hang it first with some pins or go ahead and glue it and work around it.  That way you will not forget to leave space.

Finally, think outside Halloween.  These could be cute for any holiday, a wedding, baby's room, little girl's room, or any living space.  It would all depend on your color choices  You can add embellishments like large letters, sequins, or any other bling.  Which just reminded me, I have to go and paint my Happy Halloween center and add it!  

Happy Creating!


Rebekah Kogelschatz
Your style made personal! 
Join me on a cruise June 21-24 for FREE! 
Find me on FACEBOOK

Thursday, October 13, 2011

Bridal Meltdown: A Cautionary Tale

So instead of a Thrifty Thursday feature, I've decided to bring you a cautionary bridal tale that should be a lesson to us all.  Last night I was making the rounds at some of the discount stores that sell home decor and I decided to run into Ross Dress for Less.  Now personally, I hate going to Ross, there is far too much polyester and synthetic leather for my taste...but I've heard from multiple people that they have a decent selection of home decor.  I am beginning to collect my stockpile of wedding decor and I am looking for a variety of candle holders, dishware, vases, etc. 

While perusing the aisles at Ross, I came across an aisle with cake plates and I spotted a young girl sitting on the floor (this should have been my first indication of the horrors to come...that floor is disgusting!).  This girl had taken a 3-tiered cake stand out of its box.  I was interested in the item, so I struck up a conversation to see if I could take a look.  After discussing the merits of the cake plate, I said I was shopping for my upcoming wedding.  The girl said, "Me too, I'm in wedding hell."  At that point, I took a closer look at the girl sitting on the floor.  She was wearing sweats, no makeup, glasses, and she looked like she hadn't see the right side of a brush that day.  Plus, as I mentioned, she was sitting on a very dirty floor.  After being momentarily stunned (I mean I write a wedding/entertaining/lifestyle blog...I just assume everyone is excited for weddings!), I said, "Oh, really?  You don't like doing wedding stuff?"  This bride looked at me and said "No, absolutely not when you are trying to plan a wedding in Florida from Washington, DC and you have no idea what you need."  I responded with, "Oh, I can relate.  My wedding is going to be held about 4.5 hours from here, not as bad as Florida, but still." 

This weary bride asked me when my wedding was and when I replied "next July" she gave me an envious look and said "mine's next month."  With that piece of information, I suggested she check out Posh Purpose (the best blog!) if she needed a fun read to get her through, wished her the best, and hightailed it over to another aisle.  I figured she only had about one tiny shred of sanity left and I did not want any of that bad juju rubbing off on me! 

I also had a moment of clarity and realized that I do not want to wind up parked on the dirty floor at a home decor store one month before my wedding stressing over cake plates and being envious of a bride with 9 months to spare (that's me!).  So listen up brides! Plan early and plan well and start making those spreadsheets!  If you do find yourself in a similar situation, at least take a yoga mat (you can sanitize them) to provide cushion and support (and most importantly, a barrier) between you and that floor!

Wednesday, October 12, 2011

Wedding Tip Wednesday: Macy's Registry Review

Ahhhh the wedding registry. So much fun and I feel like this experience was the closest I could ever get to being a guest at Oprah's Favorite Things (one can only hope that her new network will do a swag special from time to time...I, errr America, is still very much interested in the Queen of Talk's favorite items).

Mr. 3 and I picked Macy's as one of the places to register because we felt that they would have a good selection of items at all different price points, there would be a Macy's location in every mid-size and major city, and Macy's generally has lots of sales and coupons that our guests could use.* After sitting down with a consultant, we found out that Macy's also has a great rewards program. In addition to the 10% discount for all items that the couple purchases after the wedding, you can also participate in the Macy's Star Reward program. This program links your registry to your Macy's credit card account (I had to sign up for one), so that after your wedding you receive 5% of the value of the items purchased in a gift card reward. So if your wonderful guests purchase $1,000 of items from your registry, you will get a gift card in the mail for $50 to use at Macy's. In addition, during your engagement period, you also earn 10% rewards on any purchases that you make using your Macy's credit card (just make sure to pay it off in full every month...paying interest defeats the purpose of getting reward dollars). I think this is especially great considering Christmas is upon us (according to the not to subtle marketing ploys that would have us believe that Christmas season starts November 1st and Thanksgiving is just that pesky eating holiday to tide you over until the real deal).

Other perks about registering at Macy's are: free lipgloss with consultation at the Clinique counter, 15% off fine jewelry, and local wedding vendor information. I'll keep you posted on the ins and outs of the other places Mr. 3 and I registered, but what do you think of Macy's?  Briana is ~not~ a fan of Macy's...however, she is deeply conflicted because she is ~such~ a fan of Martha Stewart (whose home goods line is only carried at Macy's).

*When taking your future husband to register, please be prepared for endless questions and comments along the lines of : Who is going to buy all this stuff? Where are we going to put this stuff? Why do we need that? Can we get the meat grinder for the Kitchen Aid, I see myself making sausage. I don't care which color, I pick the one you like.

You can combat these comments with the same tried and true method for carrying out a successful shopping trip when you actually do buy things: frequent snacks and a place for your favorite man to park it. Despite these precautions, be prepared for your man to have a meltdown at the end of your registry shopping. After 2 hours at Macy's (with lunch preceeding and a snack break during mind you), Mr. 3 hightailed it around the store registering us for assorted china, one serving fork, and a children's backpack with skulls on it.  I then spent the last 10 minutes printing out our registry and marking it up with frowny faces :( next to these items so I would both know which ones to remove when I got home and express my displeasure in his rogue registry etiquette. I feel like this tactic fully conveyed the gravity of the matter and I tell myself that his laughter really indicated his remorse.  Let those frowny faces be a lesson...

Tuesday, October 11, 2011

Trousseau Tuesday: A Skirt That Compliments Any Fanny


Halogen® Seamed Pencil SkirtToday, I bring to all our wonderful Posh Purpose readers possibly the most wardrobe changing and fanny flattering skirt I've come across in a looooooong time!  I can't take the credit for this discovery, because I spotted it on a co-worker two weeks ago and immediately asked the what and where questions (I also asked to cop a feel of the material in a non-sexual harassment sort of manner).  Let me tell you, it was love at first sight and feel!  This Halogen pencil skirt retails for $68 at Nordstrom and is worth every single penny! I'm not the only one who is in love, so far 3 of my co-workers and myself have purchased this skirt (in multiple colors).  We are all a variety of shapes and sizes (short, athletic, tall, curvy, everything!) and it looks great on all of us!   I love how it is styled here with the bow blouse and trench coat.  The skirt is fully lined (yay warmth!) and comes in 10 different colors.  I had trouble limiting myself to just two...and evidently I'm not the only one.  My nice sales lady at Nordstrom's at Tysons Corner said they were already on their 2nd shipment and were about to sell out again and it was the most popular skirt!  I'm sure I'll enjoy this as the fall weather rolls in.  Bonus:  If you need tailoring, Nordstrom will do free alterations for you in store. 

I especially love the yellow raisin color: 
Yellow Raisin It's definitely an "in"color for the fall season.  Unfortunately, I can't wear it up close to my face without looking like a malaria victim.  I looove that I can incorporate this color at a safe distance away from giving me jaundice.  My recommendation: buy two, one in a neutral color that you can wear with everything (in my case dark camel) and the other in a fun color to add some pop to your wardrobe! 


 What are you winter fashion picks?  Let us know so we can add more fun things to our wardrobe!  Only qualifications: 1) Must be warm and 2) Must not look like a muppet swallowed us.


Thursday, October 6, 2011

Thrifty Thursday: Glitter Nails! Skip that manicure and get busy!

I was inspired by the Cashmere and Cupcakes post on mermaid nails to give my nails a new look. I was bored of the basic polish that you see everywhere and thought it was time for something different. If you are looking for ways to cut costs, consider doing your nails yourself rather than getting a manicure. Don't be sad, though! This is definitely a project that will make skipping the nail salon fun!

J sweetly got me a collection of 24 martha stewart glitters, which made my project so much more fun! I highly advocate getting these glitters. They are very fine and have an easy to use top. No mess!

I used a cheap eyeshadow brush from CVS, a mauve OPI polish (the name has disappeared) and smokey quarts Martha Stewart glitter. I painted my nails with the mauve a few days ago. Last night, I put a bit of glitter into a small bowl and placed a drop of my Sephora by OPI top coat onto the eyeshadow brush. Then I dipped the brush into the glitter (be careful not to overload the brush!) and swiped it onto a nail. I just did a line of glitter across the top of five various nails and did designs on others so that it did not look too busy. After that, I cleaned the brush by dipping it in nail polish remover and wiping it on a paper towel to eliminate glitter - be careful, though! Nail polish remover eats through synthetic bristles. After everything was very very dry, I blew on my nails to get rid of the loose glitter (none!). I then dripped more top coat onto the brush (do not want to get glitter into the top coat) and used it to seal my polish and glitter.

The color combo allows me to keep my nails pink and still fit into the fall season. And the project is a ton of fun! Make sure you have something else going on since it is a rather long process. Maybe make an event out of it! I would love to get my hands on Melinda's nails - I think they are long due for some glitter :)


Forgive the low picture quality, I had to use photo booth on my mac. Photo booth is also the reason why the words appear backward. Thanks, Apple. Btw, yay for the new iphone talk tomorrow! Also, thanks to Ashley for sending me the mermaid nail inspiration. She should really be a contributor to Posh Purpose :)

Wednesday, October 5, 2011

Wedding Tip Wednesday: DIY Craft Storage

One of the reasons why Melinda's wedding planning is so exciting for me is that I know she will be doing a bunch of DIY crafty projects. She is so creative! Of course, this also means that I will soon find myself with a glue gun permanently in hand. Oh! the things we do for family (love you, Melinda!).

Now since I love to know things, I have been searching for lots of craft ideas and thinking of the logistics for Melinda. During one of my google searches, I came across a brilliant idea for storing your crafts. Martha Stewart, like always, never fails to disappoint. She suggests using the clear storage containers to hold the pieces for each craft. Create the labels by taking a picture of the assembled project.

This is such a great idea! It is especially helpful because it allows your lovely, amazing, lifesaving helpers to assemble your vision without you having to direct every detail. This system will make that day of scramble so much less stressful! In the very beginning of decorating, you simply place each box where you want the items to be set up and then your lovely, amazing, lifesaving helpers know exactly what to do. My only suggestion beyond Martha's is to include typed assembly steps for the more complicated crafts.

Another benefit is that, during your crafting sessions, you can see what you have already accomplished and easily visualize how all of your projects will go together. Seeing your crafts organized and labeled with a lovely picture will give you satisfaction and motivation to keep crafting!

Tuesday, October 4, 2011

Trousseau Tuesday: Ideeli Goes Bridal

Ideeli is having a sale on all things bridal for the next 10 hours or so. There is a huge selection of dresses, which are pretty to look at but I would not be comfortable buying one off of the internet. However, there are also some accessories, veils and shoes! Yay, shoes! You need an Ideeli account to shop, but the company is really good about not bugging you via email. Go here to sign up!


Bagdley Mischka Randee shoes for $105.99, originally $215.00


This ABS lace dress would be adorable for a bridal shower or the rehearsal. It is listed at $89.99, originally $237.00

The veils seem to be mostly polyester, which is not ideal. However, if the veil is a category you want to save in, definitely check out the options. I saw quite a few between $50 and $150. Thanks to Sam for keeping me up to date!

Barbie Loves Weddings

Reading Between the Lines with Barbie: you should check it out. And apply what you learn to your bridesmaid selection! Here is my favorite excerpt.
Looking at these three, I’m fairly certain they met back when Barbie was a fashion model at a United Colors of Benetton photo shoot. Steph and Barbie where modeling to support themselves through school, but Kira is still a model. Kira likes to talk about how she’s still a model because beige don’t age. Stephanie responds to that with black don’t crack and to shut them both up, Barbie always brings up how much bigger her boobs are than theirs. They’re the bestest of friends.
Again, thanks goes to Ashley for sharing! I told her to make a tumblr account since she is clearly so awesome and has the best taste.

Monday, October 3, 2011

Munchie Monday: Cast Iron Fried Chicken and Gravy

Hey y'all! I'm terribly sorry for missing the past few Mondays and also for today's article being so late. However, once you try this recipe you won't be able to help forgiving me! By the way, this is definitely better than engagement chicken.

Backstory:
J made me promise not to talk about wedding stuff for the entire month of September (woo hoo! it is October now!) because he needed some time to adjust. I was not very good at following his rule, but I think I did better than he expected. Anyway, after he ate my cast iron fried chicken and gravy he was so blown away that he said I could talk about wedding stuff for two hours. Now the effects don't seem to be too long lasting, he only lasted for about an hour and fifteen minutes of wedding talk before offering to give me another hour the next night as a trade for changing the topic.

Ingredients

  • Skinless, boneless chicken - I used thighs
  • Some flour
  • Black pepper, salt, cayenne pepper
  • Cream - I only had heavy cream, so I watered it down a bit, you can also use milk
  • Water
  • Butter - a few tablespoons
  • Olive oil

Chicken Instructions
  1. Melt some butter with olive oil (prevents burning) in your large cast iron on the stove while preheating the oven to 375
  2. Mix flour, black pepper, salt and cayenne pepper - you want enough to coat all the chicken
  3. Dip a piece of chicken in the cream, let the excess drip off and then roll the chicken around in the flour mixture until coated 
  4. Repeat step 3 for all chicken bits
  5. Make sure your butter is hot and then place the chicken flat into the cast iron
  6. Flip chicken bits over when the bottom is a bit darker than golden
  7. When chicken is a uniform color all around, place cast iron into the oven
  8. Cook until done - this varies with how long you cooked on the stove top
Gravy Instructions
  1. When chicken is fully cooked, remove it from oven and let sit for a few minutes
  2. Transfer chicken onto a serving dish 
  3. Put the cast iron back on the stove top and add some more butter
  4. Now add the same mixture of flour, black pepper, salt and cayenne pepper to the hot fat in the cast iron
  5. Add enough to dry up all the fat
  6. Cook the flour-fat mixture until it no longer tastes like raw flour
  7. Combine cream and water and add slowly to the cast iron and cook until it looks like the right consistency for gravy
My mother's ratio for gravy is about 2 tablespoons of fat to 2 tablespoons of flour to 1 cup of liquid. I never remember it and always end up calling her each time I want to make gravy. And yes, I had to call her for this article as well.